How to Use Normal Keyboard on Mac
How to Use Normal Keyboard on Mac
When switching to a Mac, yous'll likely worry most about software compatibility, only don't forget all your hardware—the PC accessories and add-ons you've invested in over the years. Here's what y'all demand to know most getting that gear to piece of work with your Mac.
Keyboards
Any USB or Bluetooth keyboard (including wireless keyboards that require a USB dongle) will piece of work with the Mac—just plug it in and offset typing. However, some keys work differently on the Mac, and a Windows keyboard won't include the special-function keys you'll detect on Mac-specific keyboards.
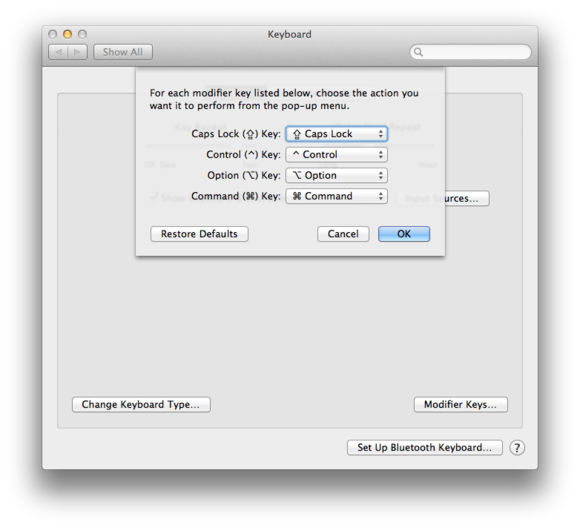
If you oft use keyboard shortcuts, you'll learn that while shortcuts in Windows typically include the Control cardinal, Bone X shortcuts more than often use the Command key. If you're using a Windows-formatted keyboard with a Mac, the Windows cardinal functions every bit the Command cardinal; similarly, the Alt cardinal functions as the Mac's Option key. (You lot can change these mappings by going to the Keyboard pane of Organization Preferences, and clicking Modifier Keys on the Keyboard screen. For example, you lot could map your Windows keyboard's Control key to the Control keypress.)
Similarly, the Mac keyboard's Delete key corresponds to the Windows Backspace or Astern Delete key; to delete forward, you can (on Mac keyboards with a number pad) press the Forward Delete primal or (on laptops and compact keyboards) press Fn-Delete.
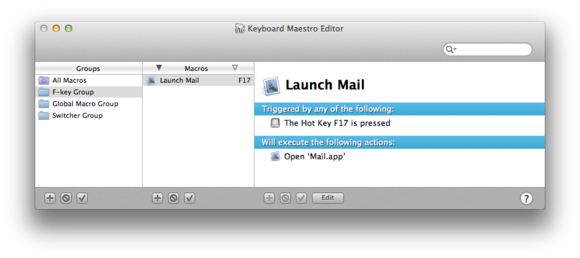
Finally, many Mac-formatted keyboards accept special functions assigned to the F-keys forth the top row. On these keyboards, the F-keys let you lot—to name a few examples—suit book and screen brightness, control media playback, and access Bone X'southward built-in Mission Control and Exposé features. You can't trigger these special functions on a Windows keyboard by default, although if you selection up third-party software such as Keyboard Maestro, you can assign these actions to keys.
Mice
As with keyboards, whatsoever USB or Bluetooth mouse (including wireless mice that connect through a USB dongle) will work with the Mac; you'll be able to click and right-click just as you did nether Windows, and if your mouse has a scrollwheel, that volition work, too. You command the mouse's basic features—tracking speed, scrolling speed, double-click speed, and primary mouse push button—in the Mouse pane of System Preferences.

Note that in Bone X 10.seven Lion and later, scrolling works the reverse of what Windows users are used to: When you spin your mouse's scrollwheel toward you lot, the content of the electric current certificate or window scrolls downwards. Apple tree calls this approach "natural scrolling," but if you lot observe it unnatural—and if you're not willing to acclimate to it—you lot can revert to traditional scrolling by using the Scroll direction setting in Mouse or Trackpad preferences.
If you lot ain a mouse with more than than two buttons, the extra buttons might work in Bone X, simply they may require a driver. Check the vendor's website for OS X drivers for your mouse. If drivers aren't available direct from the vendor, consider the third-party utilities USB Overdrive and SteerMouse; they piece of work with virtually mice and let you lot assign custom functions to each button, as well every bit perform other tweaks.
Other input devices
Most other third-party input devices—including trackpads and pen tablets—should work with your Mac. Every bit with multibutton mice, still, you may need to install drivers (from each peripheral's vendor) to enable all of their features. If drivers aren't available straight from the vendor, USB Overdrive and SteerMouse, mentioned above, will often fill the gap; similarly, if you take a Windows-formatted trackpad accessory, BetterTouchTool may let you tweak its functions nether OS 10.
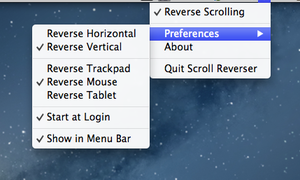
OS X's natural-scrolling characteristic applies to whatsoever pointing/scrolling device, but you lot might non want the setting to exist universal. For example, you may find that you dislike natural scrolling for your mouse, but you prefer it for your trackpad or pen tablet because on those devices scrolling feels more than like scrolling on an iPad or smartphone. The tertiary-party utility Scroll Reverser lets you tweak Os X's natural-scrolling setting independently for mice and trackpads—you can keep natural scrolling enabled for your trackpad, for case, only revert to traditional scrolling for the scrollwheel on your mouse.
Hard drives
A Mac tin can read from and write to a difficult drive formatted for Windows as FAT32 (but not as NTFS), assuming that you tin can connect the drive to your Mac. This includes any external difficult drive that uses USB, FireWire, or Thunderbolt. (No Mac has shipped with an eSATA port, but if you've added an eSATA port to your Mac, you can use eSATA drives, too.) However, Windows-formatted drives don't support all Mac features. For example, some file metadata—but not the file data itself—is lost when y'all copy files to a Windows-formatted bulldoze, and yous tin't use a Windows bulldoze equally a startup drive or backup drive for a Mac. Conversely, Windows PCs can't read Mac-formatted drives without the assistance of special software.
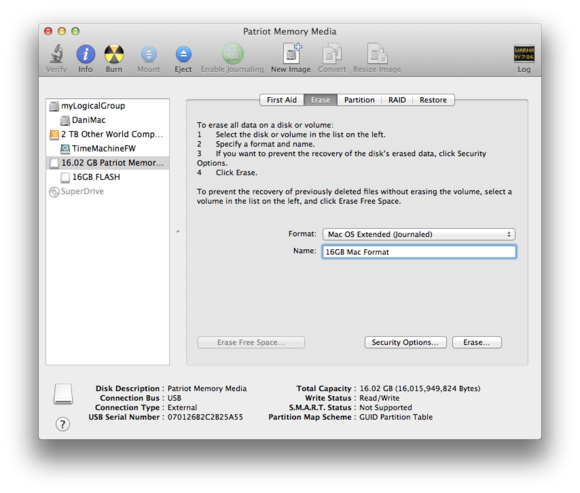
Such limitations mean that if you want to use an existing external difficult bulldoze with both your Mac and your Windows PC, you should keep information technology formatted for Windows and use it mainly for bones certificate storage. Simply if yous'll use the bulldoze merely with a Mac, you'll want to reformat the drive, using Disk Utility, specifically for the Mac.
Printers
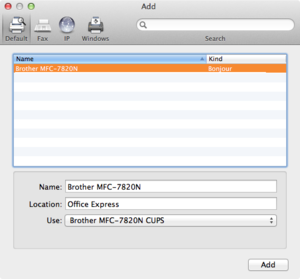
Your printer may accept come with a disc containing Mac software, or the printer vendor might make that software bachelor from its website. In most cases, you can ignore this software. OS Ten ships with drivers for most popular printers—you should exist able to plug in your USB printer, or connect your Wi-Fi or ethernet printer to your network, and print immediately. You simply need to get to the Print & Scan pane of System Preferences to set the printer. (In some cases, fifty-fifty that stride isn't necessary, and OS Ten will fix upward the printer automatically.)
If OS X doesn't accept the correct software, the Os will commonly download and install the correct drivers automatically when you set up the printer. You lot'll need to install printer drivers manually but if OS 10 specifically instructs you to practise so.
Scanners
As with printers, y'all don't demand to install any Mac drivers that might have come with your scanner, since Bone X supports a broad range of scanners out of the box—y'all just connect your USB or network scanner and start scanning. (If Os X lacks the correct drivers, it attempts to download that software and automatically install it.) Only if you get a message from Bone 10 that additional software is required should you check the vendor'southward website for drivers.
Once your scanner is prepare up, y'all tin can scan through OS X's Image Capture programme or its Preview application; y'all can besides use third-political party scanning software.
Cameras
Most digital cameras released over the by decade or and so include bundled software for both OS 10 and Windows. Yet, if you use Apple tree'south iPhoto photo-management app, you may not need that software. Well-nigh contempo cameras come up with a USB or FireWire cable; connect one end of that cable to your Mac, and the other to your camera. When you turn on your photographic camera, iPhoto should open automatically; if information technology doesn't, launch information technology. You tin then follow iPhoto's prompts to import your photos from your camera. Alternatively, yous can eject your photographic camera'southward memory bill of fare and and then, using a USB card reader—such equally the SD Menu reader built into many contempo Macs, if your camera uses SD Card—import your photos direct from the memory card.
If you use Apple's Aperture photo-management app, the procedure is similar—you just demand to launch Aperture instead of iPhoto. If you lot'd like OS X to launch Aperture automatically whenever yous connect your photographic camera or insert the memory bill of fare, you lot can tell it to do so. Launch Os 10's Epitome Capture utility while the camera or memory card is connected, select that camera or card in the Devices section on the left, so choose Discontinuity.app from the Connecting this [device] opens popular-upwardly bill of fare. You lot can too employ Prototype Capture to import photos if you don't use iPhoto or Aperture—Image Capture lets you import photos to a folder anywhere on your drive. (Similarly, you may be able to copy photos from your camera or memory carte du jour manually in the Finder when your photographic camera or card is connected.)
Speakers
Pretty much any computer speakers (or other audio systems) will work with a Mac. If your speakers or speaker system uses an analog audio cablevision, just plug that cable into your Mac'south 3.5mm audio-out (headphone) jack. Although the audio automatically routes to the speakers and the Mac'southward internal speaker is disabled, you can arrange overall book using your Mac's volume controls. Similarly, if your speaker uses a 3.5mm optical-digital connection, you can connect the digital-sound cablevision directly to the same jack on your Mac—it automatically senses when an optical cablevision is plugged in and sends a digital bespeak instead.
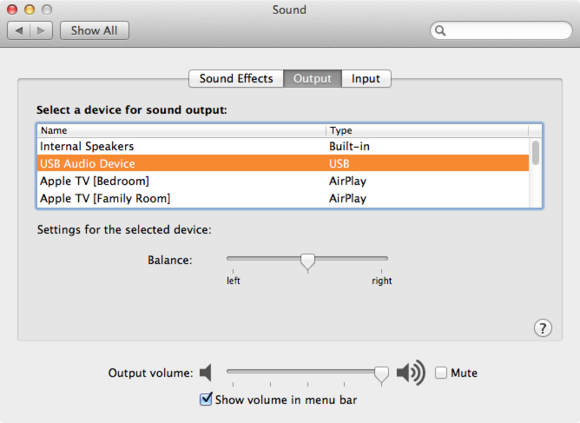
USB speakers besides work with the Mac. Connect your speaker's USB-sound cable to ane of your Mac's USB ports, and Os X should automatically route audio to the speaker arrangement. If it doesn't, you tin choose the USB speaker arrangement as your audio output by opening the Sound pane of System Preferences, clicking the Output tab, and and so choosing the USB speaker organisation as the output device. Alternatively, you can Option-click the systemwide volume-level menu, which will then show all possible audio outputs; choose your USB speakers from in that location.
Note that if you accept a 5.ane-channel speaker organisation, you'll need to connect it to your Mac using an optical-digital or USB cablevision; in improver, not all apps provide v.ane-channel audio. (iTunes and DVD Actor practice, at least for 5.1-encoded video.)
Other peripherals
These days, nigh accessories and peripherals that can connect to your Mac will work with your Mac—many without additional drivers or other software. (Exceptions are PCI expansion cards and similar hardware upgrades.) And so before you get out and buy new gear, plug in your erstwhile stuff and see if it works. If it doesn't immediately, check the vendor'southward website to see if the item will work with updated software.
Updated 7/2/2013, 9:15am to clarify hard-drive compatibility.
How to Use Normal Keyboard on Mac
Posted by: rubinhavenou.blogspot.com